

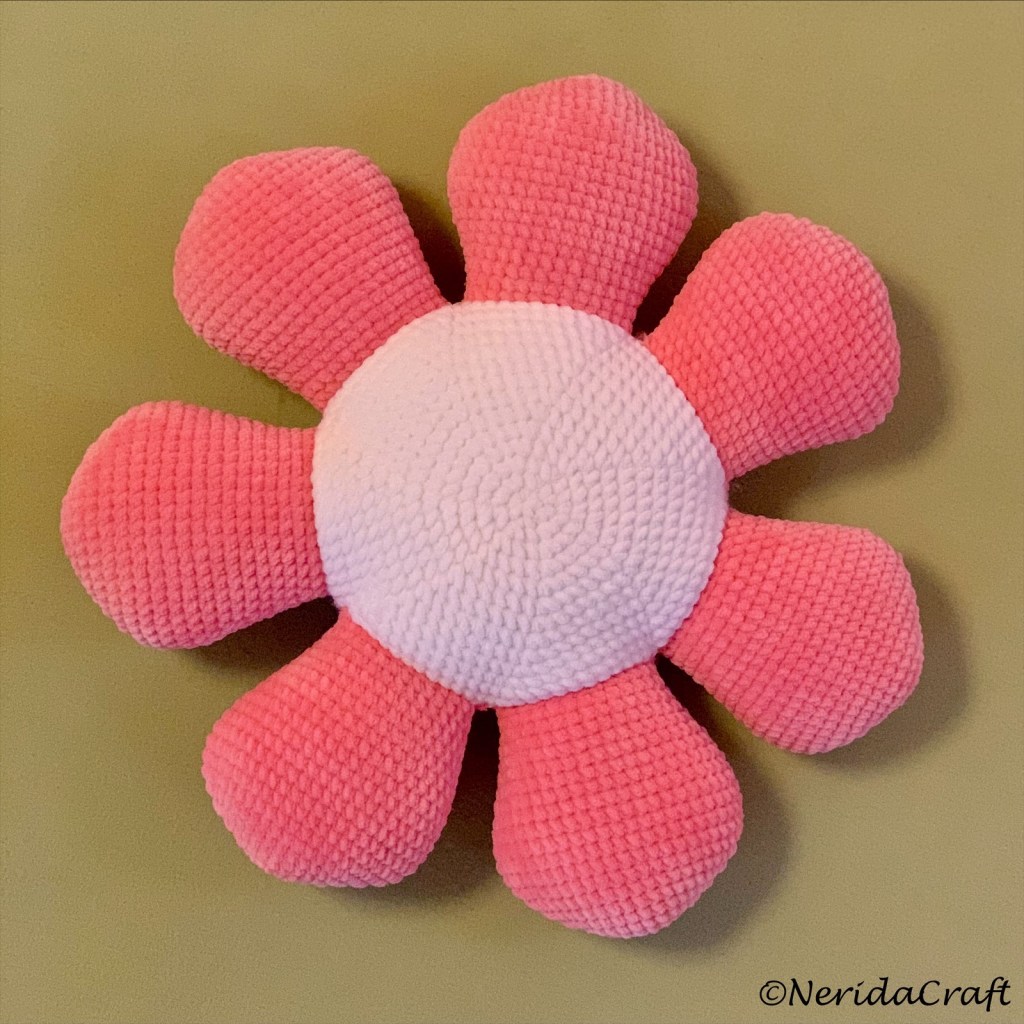
After crocheting so many pillows recently I felt I still need a new one, a flower-shaped pillow that I haven’t made yet. Finally I ended up with three 😊:
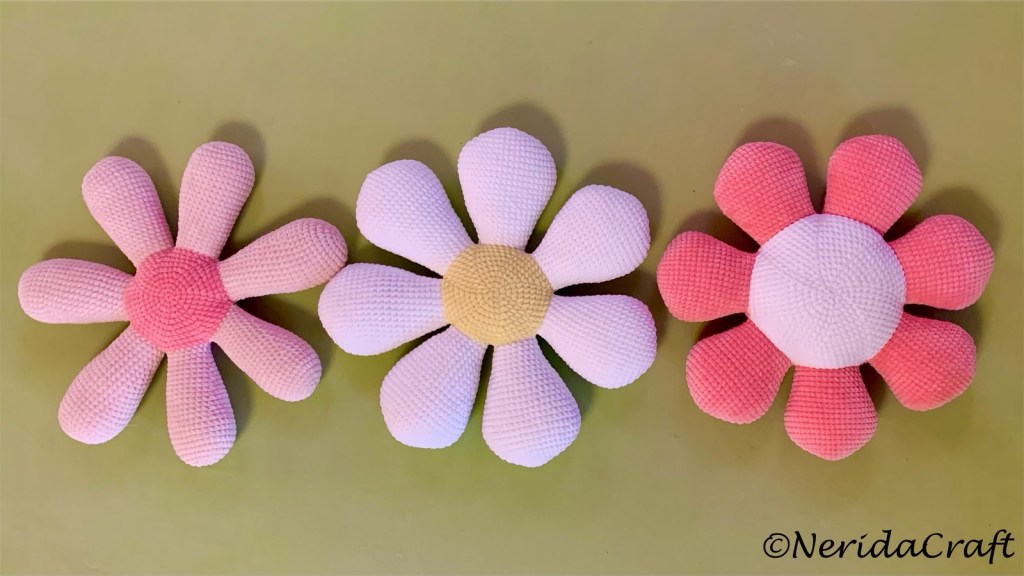
When I finished with the first one (on the left), I thought it would be better with wider petals, so made a second one (in the middle), then decided to make a third one with bigger center, and make the petals smaller to get the same size (on the right).
To be honest, I’m still not fully satisfied with the pattern, as the petals have to be sewed on the middle pieces at the end… and this is a tricky part of the pattern, not that easy, and I hate sewing… but then decided I’ll though share here all the three. I think they are lovely and I always have to smile when looking on them, so why not? 😊
I used yarn Himalaya Dolphin Baby, as for the stars, the moon, and the cloud pillows, and a 4.5 mm crochet hook.
Pattern instructions:
Size: cca 46 cm (diameter)
Yarn: Himalaya Dolphin Baby (100 polyester; 100g – 120mt/131 yds; hook size 4.5 mm)
Stitches used and abbreviations (US):
- slst: slip stitch
- sc: single crochet
- sc inc: single crochet increase – make 2 sc’s in the same stitch
- sc dec: single crochet decrease (for this type of yarn better to use normal decreases not the invisible one)
Work in rounds, in a spiral form continuously.
Daisy #1
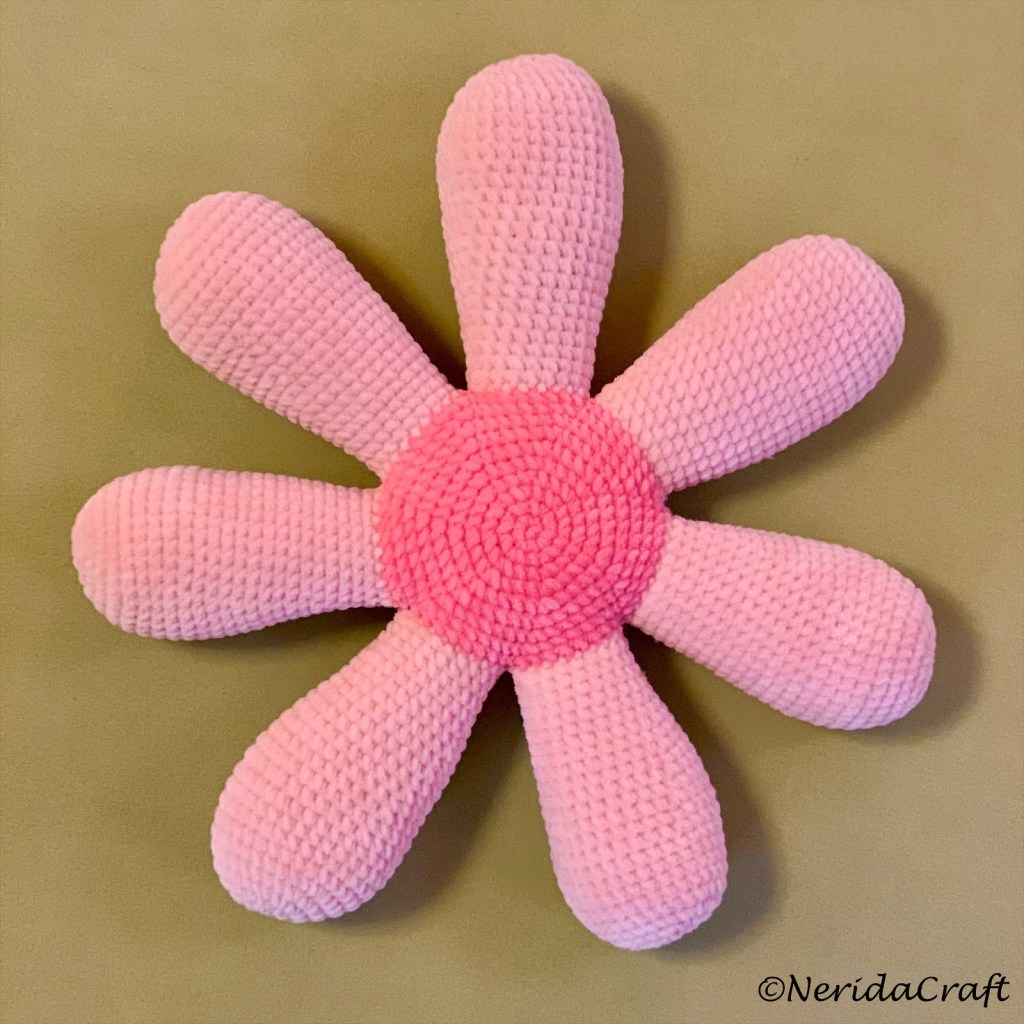
Center (x2):
First make two cirles, the inner part of the flower (dark pink)
R1: ch 2 and make 7 sc in 2nd stitch from hook (7 sts) (for this kind of yarn this worked better for me than starting with a magic ring)
R2: 7 sc inc (14 sts)
R3: (1 sc inc, 1 sc) x 7 (21 sts)
R4: (1 sc inc, 2 sc) x 7 (28 sts)
R5: (1 sc inc, 3 sc) x 7 (35 sts)
R6: (1 sc inc, 4 sc) x 7 (42 sts)
R7: (1 sc inc, 5 sc) x 7 (49 sts)
R8: (1 sc inc, 6 sc) x 7 (56 sts)
R9: (1 sc inc, 7 sc) x 7 (63 sts)
R10: (1 sc inc, 8 sc) x 7 (70 sts)
Close with an slst to the next stitch and cut the yarn. (For Daisy #3 do not stop here, but continue with R11 as below).
Petals (x7):
R1: ch 2 and make 8 sc in 2nd stitch from hook (8 sts)
R2: 8 sc inc (16 sts)
R3: (2 sc inc, 4 sc, 2 sc inc) x 2 (24 sts)
R4: (2 sc inc, 8 sc, 2 sc inc) x 2 (32 sts)
R5: (1 sc inc, 14, 1 sc inc) x 2 (36 sts)
R6 – R9: 36 sc (36 sts, 4 rounds)
R10: (1 sc dec, 16 sc) x 2 (34 sts)
R11: 34 sc (34 sts)
R12: (1 sc dec, 15 sc) x 2 (32 sts)
R13: 32 sc (32 sts)
R14: (1 sc dec, 14 sc) x 2 (30 sts)
R15: 30 sc (30 sts)
R16: (1 sc dec, 13 sc) x 2 (28 sts)
R17: 28 sc (28 sts)
R18: (1 sc dec, 12 sc) x 2 (26 sts)
R19: 26 sc (26 sts)
R20: (1 sc dec, 11 sc) x 2 (24 sts)
R21: 24 sc (24 sts)
R22: (1 sc dec, 10 sc) x 2 (22 sts)
R23: 22 sc (22 sts)
R24: (1 sc dec, 9 sc) x 2 (20 sts)
R25: 20 sc (20 sts)
Close with an slst, stuff, fasten off, leaving a tail for sewing (or may use a different worsted yarn to sew them all to the middle part when finished with all the petals). Sew the first 10 stitches to the first 10 stitches of the middle (with right sides facing together). Sew all the other petals one by one to the coming 10 stitches of the same middle part.
After the 7th petal completed and sewed to the same middle circle, it looks like this:
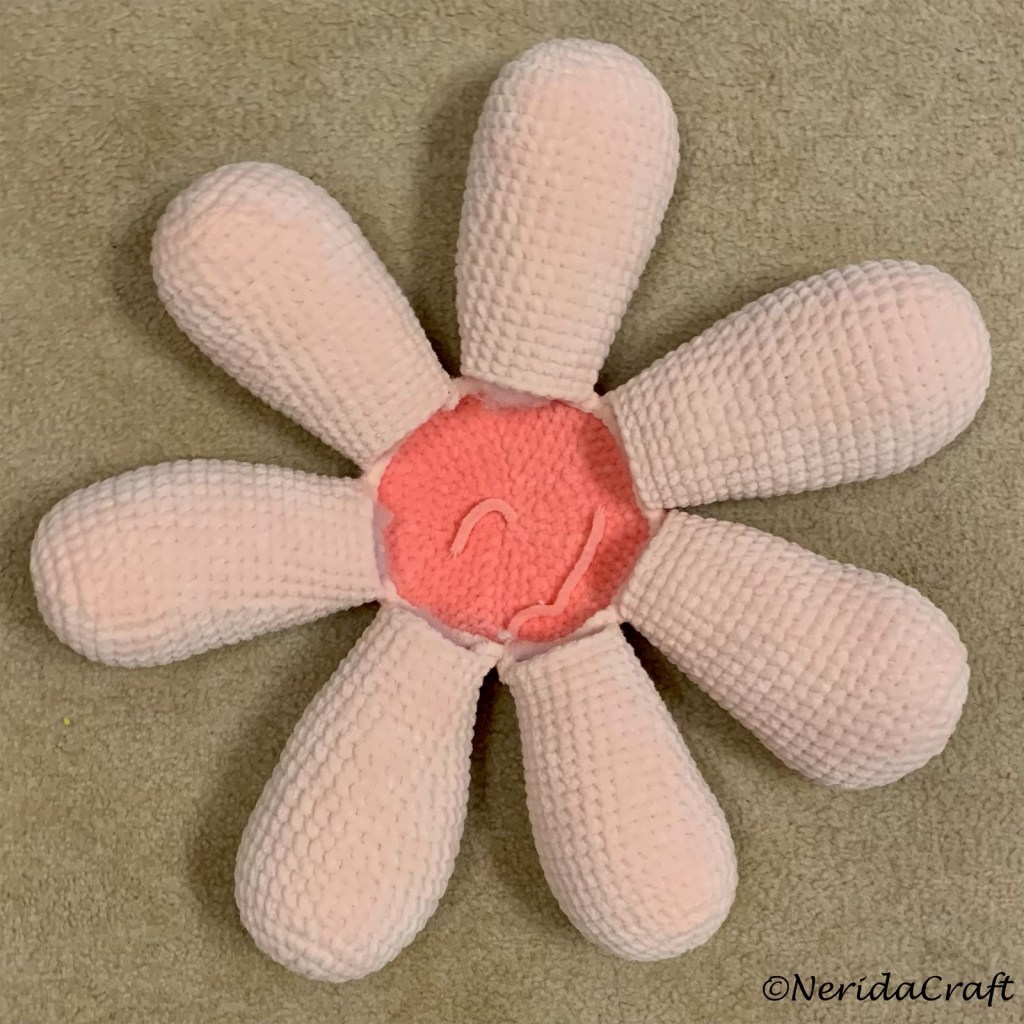
Now sew the other half of the petals (using the 10 remaining stitches) to the other mid piece the same way, to the other circle. Stuff continuously.
NOTE: It’s important, that after the first petal, with one stitch sew the 2 middle circles together as well! Make this before / after sewing the 2nd, 3rd, …, 7th petal to the second middle part, to avoid having holes between the petals at the end.
Daisy #2
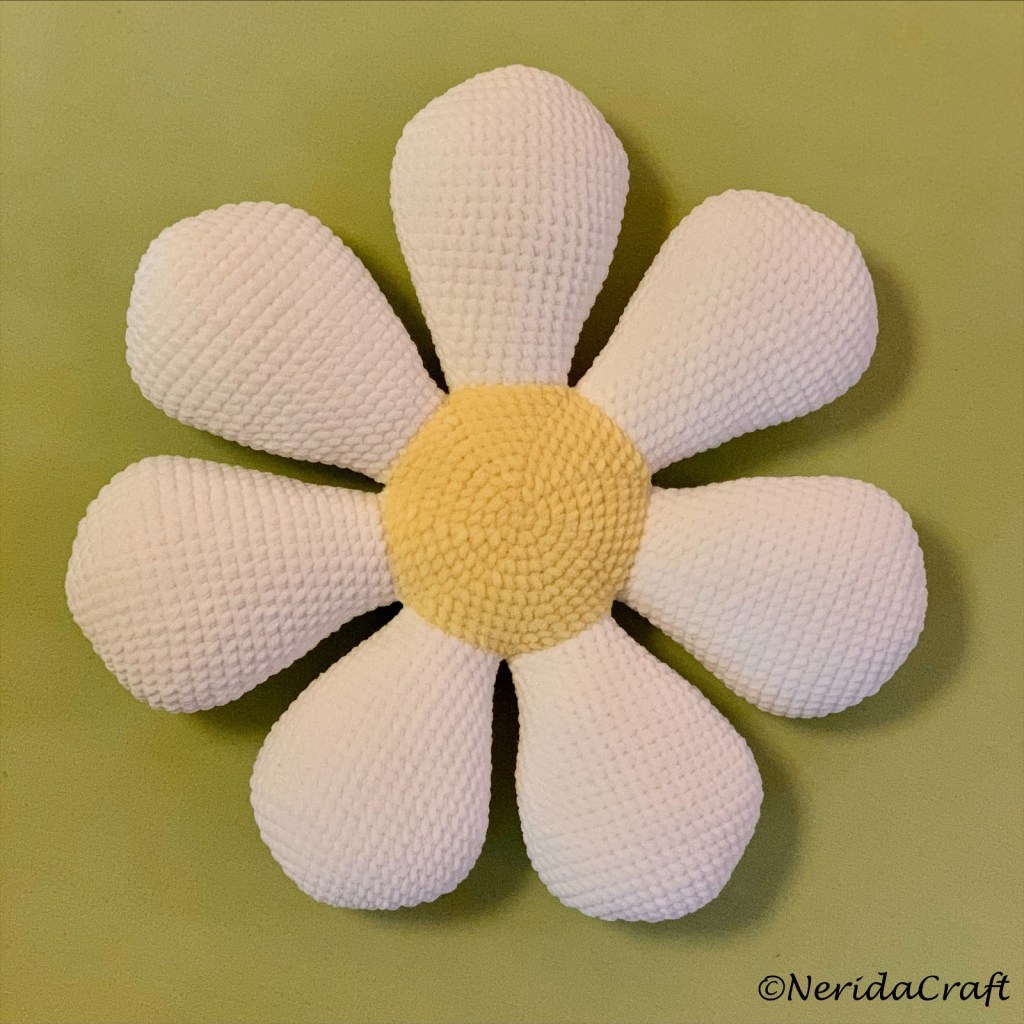
Center (x2):
The same as for Daisy #1. (In yellow, or as selected)
Petals (x7):
R1: ch 2 and make 8 sc in 2nd stitch from hook (8 sts)
R2: 8 sc inc (16 sts)
R3: (2 sc inc, 4 sc, 2 sc inc) x 2 (24 sts)
R4: (2 sc inc, 8 sc, 2 sc inc) x 2 (32 sts)
R5: (2 sc inc, 12 sc, 2 sc inc) x 2 (40 sts)
R6: (1 sc inc, 18 sc, 1 sc inc) x 2 (44 sts)
R7: (1 sc inc, 20 sc, 1 sc inc) x 2 (48 sts)
R8 – R11: 48 sc (48 sts, 4 rounds)
R12: (1 sc dec, 20 sc, 1 sc dec) x 2 (44 sts)
R13: 44 sc (44 sts)
R14: (1 sc dec, 18 sc, 1 sc dec) x 2 (40 sts)
R15: 40 sc (40 sts)
R16: (1 sc dec, 16 sc, 1 sc dec) x 2 (36 sts)
R17: 36 sc (36 sts)
R18: (1 sc dec, 14 sc, 1 sc dec) x 2 (32 sts)
R19: 32 sc (32 sts)
R20: (1 sc dec, 12 sc, 1 sc dec) x 2 (28 sts)
R21: 28 sc (28 sts) / For Daisy #3 stop here/
R22: (1 sc dec, 10 sc, 1 sc dec) x 2 (24 sts)
R23: 24 sc (24 sts)
R24: (1 sc dec, 8 sc, 1 sc dec) x 2 (20 sts)
R25: 20 sc (20 sts)
Sew the petals to the first, then to the second middle part as for Daisy #1. Do not forget to add an extra stitch between the petals to sew the circles together as well not to have holes between the petals.
Daisy #3
Center (x2):
The first 10 rounds are the same as for Daisy #1 center part above. Then continue as:
R11: (1 sc inc, 9 sc) x 7 (77 sts)
R12: (1 sc inc, 10 sc) x 7 (84 sts)
R13: (1 sc inc, 11 sc) x 7 (91 sts)
R14: (1 sc inc, 12 sc) x 7 (98 sts)
Petals (x7):
Make R1 – R21 of petals of Daisy #2.
Sew the pieces together the same way as for Daisy #1 (or #2), but use the first 14 stitches of the petals and the middle part for each piece instead of 10.
And it’s done! 😊 I hope my instructions were clear, and the pillows will make you smile too when finished. 😊
Cheers,
Judit
